VIEW VIDEO: How to Tie a Rope Tackle


We apply a rope tackle, (also known as the Trucker’s Hitch, Lineman’s Hitch, Load Binder, and Harvester Hitch) where the guylines meet the anchors for pretty much all our pioneering projects. For safety reasons, Taut-Line Hitches should never be used in any pioneering work, because if the tension is eased the knot can slip.
The rope tackle is one of the many skills learned for pioneering that can be used in a variety of situations for many years to come.

Frequently, we use a rope tackle when creating a ridge line between two trees for dining flies and tarps, and love using them whenever there’s an appropriate need to hold the strain on a line being tightened.

![]()

The following drawings and text have been extracted directly from the 1993 publication of the Pioneering Merit Badge Pamphlet written by Adolph Peschke:
When you want to lift or pull more than your own strength will permit, or when you want to make a heavy lifting job a little easier, the rope tackle is a device that can be used.
The idea behind a rope tackle is similar to that of a tackle using blocks and pulleys. In a rope tackle, one lead (end) of the rope has to be fixed. That is, it has to be anchored around a spar or tied through a ring or other piece of hardware that doesn’t move.
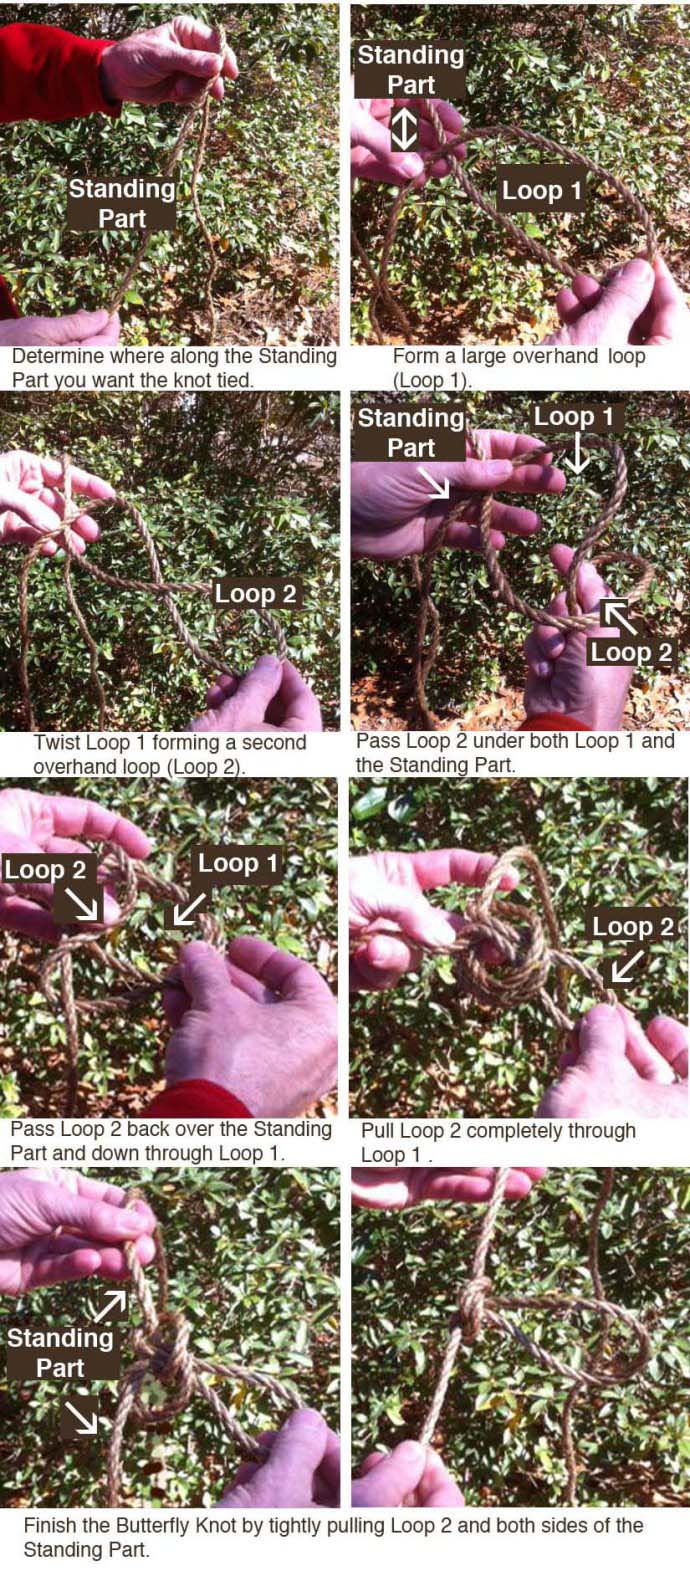
Loop knot. Then a loop knot is tied along the standing part of the rope. The Butterfly Knot and the Bowline on a bight are suitable for making a loop knot because they can be tied in the standing part of the rope and they are both easy to tie and fairly easy to untie even after being put under a strain. If you have no other reason to become proficient in tying these two knots, the rope tackle should convince you.

Connect with the load. After you’ve tied the loop knot, it forms a fixed loop that acts as the wheel in a block. If you’re using the rope tackle to lift or pull an object, pass the running end through a ring or other hardware that’s attached to the object (load). The ring (or other hardware) is used so that the rope is free to slide as you pull on the hauling end of the rope as the tackle takes effect. If you want to use the rope tackle to tighten a line, pass the running end around a fixed object such as a spar, a stake, or a tree.
Finally, the running end of the rope is passed through the fixed loop in the loop knot. The running end becomes the hauling line which is pulled to make the tackle work.
Principles. The rope tackle works on the same principles as any other tackle using mechanical blocks or pulleys. The rigging method shown on the left develops twice the lifting or pulling power that’s applied to the hauling end. In other words, you can lift a fifty-pound weight using only twenty-five pounds of force on the hauling end.
To determine how much force is needed to lift a weight, the general rule is that you count the number of ropes passing through the ring where the object (load) is. In this case there are two ropes passing through the ring that’s attached to the load. Then divide the number into the weight being lifted. Let’s assume that the weight being lifted is fifty pounds. The answer is twenty-five pounds, which is the amount of pull required to lift the fifty pounds with the rope tackle.
When you take into consideration the friction of the ropes rubbing together, you will have to apply a bit more than the twenty-five pounds to make the lift. But even with the loss caused by friction, the rope tackle is quite effective.
Sometimes it is better to actually experience the effect of how the rope tackle works than it is to understand the technical explanation of the process. Setting up a rope tackle will convince you.

Tying off. When using a rope tackle, if you want to hold the position of a load being lifted or pulled, or if you want to hold the strain of a line being tightened, form a bight in the hauling end of the rope and tie it off with a tight Half Hitch below the fixed loop in the Butterfly Knot.
Types of rope. The type of rope you choose for a rope tackle should have a low stretch factor, such as pure manila rope. Ropes that stretch like polypropylene and nylon, even though they are strong, require that you pull the stretch out of the rope before your tackle takes effect.
Note: When in use, the rope tackle can put considerable strain on the fibers of the rope. Therefore, repeated use of the same section of the rope for this purpose should be avoided. The ropes used to make the tackle should be inspected for damaged fibers on a regular basis.
Uses of the rope tackle. The wide range of uses for a rope tackle by a number of different craftsmen speaks for its effectiveness. Each craft seems to use a slightly different knot or hitch to form the loop that makes a rope tackle. The Lorryman’s Hitch, the Lineman’s Hitch, the Stagehand’s Hitch, are all samples of different knots or hitches used to form the loop. The only difference between these hitches is that in some of them the type of knot used to make the loop is more easily untied than others after a hard pull. But they all do essentially the same thing. That is, they form a fixed loop for the rope to be used as a tackle.
The extent to which the rope tackle has been used by craftsmen and tradesmen in their daily work can be better understood from the following list of uses and by the various names by which it is called:
- The Linesman’s Hitch is used to put strain on a line in the process of stringing electric or telephone lines. It was used as far back as the building of the telegraph lines that opened up the western states during the 1800s.
- The Stagehand’s Hitch is used to adjust the height of the curtains on a theater stage.
- The Wagoneer’s Hitch is an English reference to the hitch used to secure the load on a wagon or lorry.
- The Load Binder is is what the farmer called the hitch he used to tie down a load of hay on his wagon.
Pulling a log. One of the uses of a rope tackle is to pull a heavy load such as a log. To do this, you need two ropes. Tie a short (6′ to 8′) length of rope to the end of the log with a Timber Hitch. Then tie a bowline at the other end of this rope.

To pull the log, tie a long line to a tree or other anchor point with a Roundturn with Two Half Hitches. Then tie a Butterfly Knot in the long line to form the loop for a rope tackle. Run the end of the long line through the Bowline and back through the fixed loop in the Butterfly Knot. Then pull on the end of the long line to pull the log.
Pioneering Uses
- To adjust the strain on the guylines of a pioneering project or a flagpole (see figures 98 and 99)
- To put the strain on a picket line used for tying up horses or canoes
- To tie down and secure your equipment on a trailer or truck (see figure 100)
- To hoist or lower equipment in rock climbing
- To tie a line to air your sleeping bag or to make a clothesline for wet clothes
- To tighten hold-down ropes on large tents and flies
Single Pull Rope Tackle Monkey Bridge Configuration