When tying the basic, oft-used, simple “two-half-hitches” (double-half-hitch), instead of applying a clove hitch around the standing part, there’s a thing about mistakingly tying a lark’s head. This accident rears its head time and again, and many Scouts (both youth and adult) somehow don’t recognize the difference. Fact remains, tying a lark’s head around the standing part (cow hitch) doesn’t provide the same holding effect or friction as forming a clove hitch. Mostly, it does the trick, BUT, it’s not the same and shouldn’t be considered as such.
A clove hitch is formed by tying two half hitches in the same direction. The lark’s head is made up of two half hitches tied in opposite directions (see above video).
This becomes a “bigger” issue when tying a taut-line hitch. If the half hitches aren’t tied in the same fashion (if the running end isn’t spiraling around the standing part in the same direction), instead of a rolling hitch around the standing part, what you get is a lark’s head along with an extra round turn. This provides less friction. It will not grab the guyline as well, and hence is less effective.
In addition to the campcraft jobs it does so well, the lark’s head is useful in Pioneering too. Besides coming into play to hang all kinds of stuff, it’s how we start off the Filipino diagonal lashing.
III A. In the BSA, the square knot is commonly referred to as a joining knot and tying it is a requirement to earn the Scout rank. However, the square knot (reef knot) is first and foremost a binding knot. For our purposes, its primary use will be to complete a Mark II Square Lashing.
III B. A roundturn with two half hitches is one of the basic knots that is very reliable for a number of uses in pioneering work. It is easy to tie and untie and does not reduce the strength of the rope due to sharp turns when under a hard pull.
OBJECTIVES
Scouts will show they understand the square knot is used as a binding knot and will demonstrate they can always tie it (instead of a granny knot) by relying solely on the appearance of the first overhand knot. Refer to Foolproof Way to ALWAYS Tie a Square Knot Right.
Scouts will demonstrate how a roundturn can be used to temporarily hold the strain on a rope.
Scouts will demonstrate they can tie two half hitches around the standing part of a rope and draw them up tight against a roundturn.
MATERIALS
3-foot length of 3/16 or 1/4-inch braided nylon or polyester cord for each Scout
Length of 1/2-inch nylon or polyester cord and a vertical pole or tree, to serve as a large visual aid
Sturdy horizontal pole, lashed between two trees or anchored uprights about 3-1/2 feet off the ground
One 15-foot x 1/4-inch manila lashing rope for every two Scouts
PROCEDURE A
Standing End on Top, Standing End on Bottom
Utilizing the 1/2-inch cord and vertical pole or tree, the instructor demonstrates how a square knot is used to secure a line or rope directly around an object.
While tying an overhand knot (half knot) around the pole, the instructor explains how it’s always possible to know how to tie the second overhand knot just by looking at the first. This can be illustrated by positioning the two running ends so they are perpendicular to the standing part wrapped around the pole, (see Illustration 1) It’s pointed out that one running end is on the bottom and the other is on the top. When bringing the ends together to tie the second overhand knot, the end on the bottom should stay on the bottom and the end on top should stay on the top, and then the second overhand knot can be tied to form the square knot correctly 100% of the time. This is demonstrated by the instructor!
Using their 3-foot cord, Scouts tie an overhand knot around their thigh, and then position the two ends so they lie at right angles to the part wrapped around their thigh. They then practice carrying the bottom and top ends together to form a square knot.
Scouts bring their 3-foot cords to the horizontal pole(s) and each ties an overhand knot around the pole. When all the overhand knots are in place, they back away and change places with another Scout. The “new” overhand knot is interpreted, and relying only on its appearance, Scouts complete the square knot.
Finishing a Square Knot By Relying Solely on the Appearance of the First Overhand Knot
5. Alternating the position of the running ends of overhand knots tied around the horizontal pole, races are run between individuals to determine that the ability to rely only on the appearance of the initial overhand knot has been mastered. Reviews are conducted as necessary.
Finishing a Square Knot By Relying Solely on the Appearance of the First Overhand Knot
PROCEDURE B
1. The instructor wraps the 1/2-inch cord around the horizontal pole forming a roundturn. He explains that a roundturn goes around the pole twice, and when maintaining a grip on the running end, a good deal of stress can be held because of the friction around the pole created by the roundturn.
Applying a Roundturn to a Horizontal Pole
2. The instructor ties a half hitch around the standing part of the rope and cinches it up to the roundturn on the pole.
3. The instructor ties a second half hitch around the standing part and cinches that up to the first. He explains that these two half hitches have formed a clove hitch around the standing part and the knot is often called two half hitches. He further explains that when two half hitches are tied like this after a roundturn, the knot is called a roundturn with two half hitches and, as will be seen later, is often used on guylines and anchor points when building a pioneering structure.
Adding Two Half Hitches to the Roundturn
4. The class is divided into twos. The first Scout holds the end of the 15-foot rope and stands about 12 feet away from the horizontal pole. The second Scout goes to the pole and with the other end of the rope applies a roundturn, while the first gives the rope some tension with a slight, steady pull. When the roundturn is completed, the second Scout lets go of the standing part and with one hand grabbing the running end, he holds the strain still applied by the first Scout. He then adds two half hitches. When the roundturn with two half hitches is tied, the second Scout lets go of the rope entirely. The two Scouts switch so that everyone in the class can demonstrate they are comfortable tying the knot.
The following text is by Adolph E. Peschke as presented in the 1998 printing of the 1993 edition of the Pioneering Merit Badge Pamphlet:
This is one of the basic knots that is very reliable for a number of uses in pioneering work. It is easy to tie and untie and does not reduce the strength of the rope due to sharp turns when under a hard pull.
You start by making a roundturn. This provides extra surface around the spar when chafing or slipping might be a problem. Once you’ve made the roundturn, the rope has a grip on whatever it’s around (see 1). The strain on the rope can then be adjusted before finishing off with two half hitches (see 2 and 3).
The knot is well suited for both ends of a guyline. When it is used in a place where you will not have easy access, as at the top of a tower, secure the running end, (after the two half hitches are tied) with a piece of light cord.
It can be tied in the middle of a long rope by making a long bight with enough rope to make two half hitches after the roundturn.
1, 2, and 3 (below) illustrate the half hitches tied loosely. In actual use both half hitches are pulled up tight.
Tying a Roundturn with Two Half Hitches
To make the knot, start by making a roundturn over a spar.
Next, make a half hitch around the standing part of the rope. Then make another half hitch.
When both half hitches are made, pull them tight, and secure the ends with a small cord.
PIONEERING USES
At both ends of large hand and foot ropes for a monkey bridge. Be sure to secure the running ends with a light cord.
When wear is a factor when tied to an iron ring.
For guylines because it does not jam, and is easy to untie when adjustments are needed.
The following text is by Adolph E. Peschke as presented in the 1998 printing of the 1993 edition of the Pioneering Merit Badge Pamphlet:
Before you begin learning new knots, you need to know some of the basic terms used in knot tying. You should become familiar with these terms and use them as you learn how to tie the various knots.
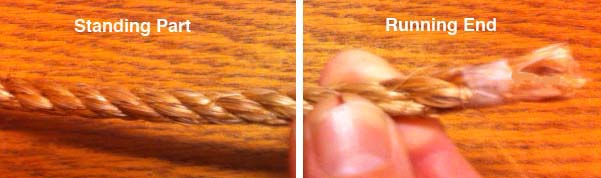
Running end and standing part. These are two of the most common terms used in knot tying. The running end is the end of the rope that is used to tie the knot. This end is sometimes referred to as the working end. The rest of the rope is the standing part.
Standing Part and Running End
Overhand loop. An overhand loop is formed when a loop is made so that the running end of the rope is on top of the standing part. It can be formed anywhere along the standing part of the rope in the same fashion.
Underhand loop. And underhand loop is formed when the running end of the rope is placed under the standing part of the rope.
Overhand and Underhand Loops
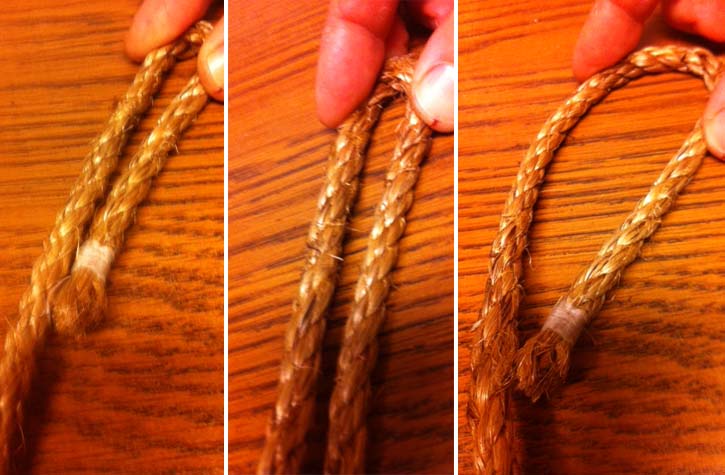
Bight. A bight is formed by doubling back a length of the rope against itself to form a U.
This can be done with the running end (as shown on the left), or anywhere along the standing part (as shown in the middle). Bights can vary from a few inches to a few feet in length. A bight doesn’t have to have a sharp bend. It can be “open” (as shown on the right). In this case, the running end of the rope is alongside the standing part of the rope, but is not crossed over (which would form and overhand or underhand loop).
A Bight
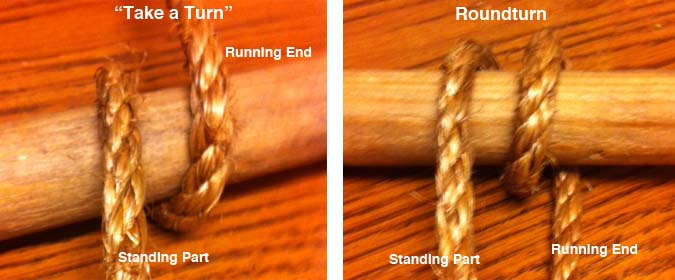
Take a turn. The term take a turn means to wrap a rope around a spar or stake so it continues off in the same direction. The friction this creates will give you a grip on the stake or spar that will help you hold the strain on the line. It also gives better control in taking up or letting out a line.
Roundturn. To make a roundturn, wrap the rope completely around a spar and bring the running end back along the standing part of the rope. A roundturn gives you even more grip in holding the strain on a line, and is the basis for tying several knots, as when making a Roundturn with Two Half Hitches.
Bend – A bend is a knot used to join two lengths of rope.
Bight – A bight has two meanings in knotting. It can mean either any central part of a rope (between the standing end and the working end) or an arc in a rope that is at least as wide as a semicircle. In either case, a bight is a length of rope that does not cross itself. Knots that can be tied without use of the working end are called knots on the bight.
Binding Knot – Binding knots are knots that either constrict a single object or hold two objects snugly together. Whippings, seizings and lashings serve a similar purpose to binding knots, but contain too many wraps to be properly called a knot. In binding knots, the ends of rope are either joined together or tucked under the turns of the knot.
Capsizing – A knot that has capsized has deformed into a different structure. Although capsizing is sometimes the result of incorrect tying or misuse, it can also be done purposefully in certain cases to strengthen the knot
Decorative Knot – A decorative knot is any aesthetically pleasing knot. Although it is not necessarily the case, most decorative knots also have practical applications or were derived from other well-known knots. Decorative knotting is one of the oldest and most widely distributed folk art.
Dressing – Knot dressing is the process of arranging a knot in such a way as to improve its performance. Crossing or uncrossing the rope in a specific way, depending on the knot, can increase the knot’s strength as well as reduce its jamming potential.
Elbow – An elbow refers to any two nearby crossings of a rope. An elbow is created when an additional twist is made in a loop. An example is when tying a Butterfly Knot.
Flake – A flake refers to any number of turns in a coiled rope. Likewise, to flake a rope means to coil it.
Frap – Fraps are a set of loops coiled perpendicularly around the wraps of a lashing as a means of tightening.
Friction Hitch – A friction hitch is a knot that attaches one rope to another in a way that allows the knot’s position to easily be adjusted. Sometimes friction hitches are called slide-and-grip knots. They are often used in climbing applications. Good examples of a friction hitch are the Rolling Hitch and Prusik.
Hitch – A hitch is a knot that attaches a rope to some object, often a ring, rail, spar, or post.
Jamming – A jamming knot is any knot that becomes very difficult to untie after use. Knots that are resistant to jamming are called non-jamming knots.
Lashing – A lashing is an arrangement of rope used to secure two or more items together in a rigid manner.
Loop – A loop is one of the fundamental structures used to tie knots. It is a full circle formed by passing the working end of a rope over itself.
Loop Knot – A loop knot is the type of knot that forms a fixed loop. It is created either when the end of a rope is fastened to its own standing part or when a loop in the bight of a rope is knotted. Unlike a hitch, a loop knot creates a fixed loop in a rope that maintains its structure regardless of whether or not it is fastened to an object. In other words, a loop knot can be removed from an object without losing its shape.
Noose – A noose can refer to any sliding loop in which the loop tightens when pulled.Open Loop – An open loop is a curve in a rope that resembles a semicircle in which the legs are not touching or crossed. The legs of an open loop are brought together narrower than they are in a bight.Seizing – A seizing is a knot that binds two pieces of rope together side by side, normally in order to create a loop. The structure of seizings is similar to that of lashings.
Setting – Setting a knot is the process of tightening it. Improper setting can cause certain knots to underperform.
Slipped Knot – A slipped knot is any knot that unties when an end is pulled. Thus, tying the slipped form of a knot makes it easier to untie, especially when the knot is prone to jamming.
Splice – Splicing rope is a method of joining two ropes done by untwisting and then re-weaving the rope’s strands.
Standing End – The standing end (or standing part) of a rope is the part not active in knot tying. It is the part opposite of the working end.
Stopper Knot – A stopper knot is the type of knot tied to prevent a rope slipping through a grommet or as a temporary whipping.
Whipping – A whipping is a binding knot tied around the end of a rope to prevent the rope from unraveling.
Working End – The working end (or working part) of a rope is the part active in knot tying. It is the part opposite of the standing end. (Working End is another name for Running End.)

 applying a clove hitch around the standing part, there’s a thing about mistakingly tying a lark’s head. This accident rears its head time and again, and many Scouts (both youth and adult) somehow don’t recognize the difference. Fact remains, tying a lark’s head around the standing part (cow hitch) doesn’t provide the same holding effect or friction as forming a clove hitch. Mostly, it does the trick, BUT, it’s not the same and shouldn’t be considered as such.
 A clove hitch is formed by tying two half hitches in the same direction. The lark’s head is made up of two half hitches tied in opposite directions (see above video).